Table of Contents
 This page is not fully translated, yet. Please help completing the translation.
(remove this paragraph once the translation is finished)
使用 LuCI网页界面配置 OpenVPN 客户端
简介
- 本文介绍了如何通过 LuCI 网络界面,安装设置 OpenVPN 客户端。
- 您可以通过本文的操作,连接到 OpenVPN 服务器(私有或者服务商提供的)。
- 参考 OpenVPN basic 搭建服务器,通过 OpenVPN extras 进行更多细节调整设置。
- 不同SoCs系统的加密解密性能参照: OpenVPN performance。
目标
- 加密您的互联网连接以加强安全和隐私。
- 防止客户端的数据泄露和流量欺骗。
- 使用商业 VPN 服务绕过区域限制。
- 规避客户端内容过滤和互联网审查。
- 更方便地远程访问您的局域网服务(无需端口转发)。
网页界面说明
1. 安装所需软件包
安装 openvpn-openssl 和 luci-app-openvpn 以通过网页界面管理OpenVPN。
安装后会新增OpenVPN的 LuCI 管理页面
位于 LuCI → VPN → OpenVPN

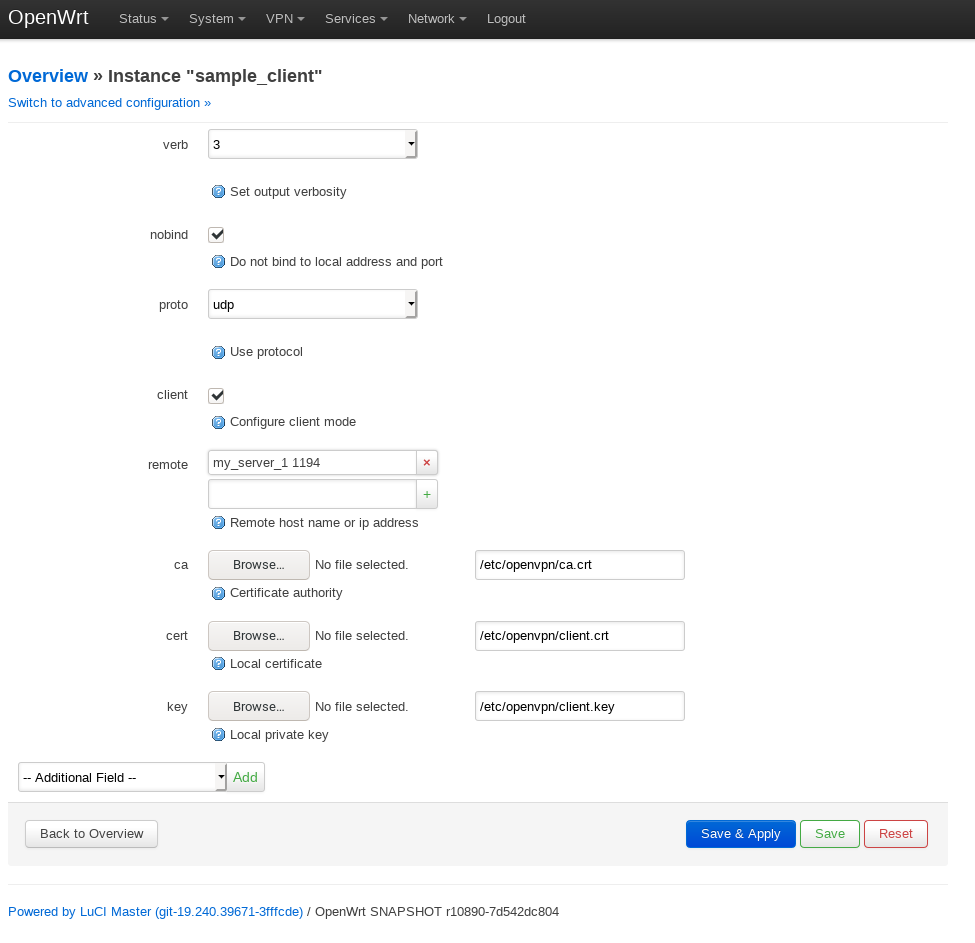
2.a 手动编辑配置以用于生成配置文件
通过基于模板的配置新增配置,填写配置名称,选择模板,点击新增。
新增后OpenVPN 实例列表会有相应的新增配置,点击编辑按钮,可对词配置文件进行编辑。
2.b 上传 OpenVPN 配置文件
此项功能从OpenWrt 19.07版本以后可用。
注重用户体验的OpenVPN服务商都会提供OpenVPN配置文件以简化操作,您可以导入配置文件至路由器或者网络设备以连接服务。
当然,您也可以在OpenWrt使用配置文件。
通过OVPN 配置文件上传功能,设置配置文件,选择配置文件,然后点击上传。
新增后OpenVPN 实例列表会有相应的新增配置。
If your provider requires you to write your username and a password, click on the Edit button, and in the edit page, write your username and password in the second text box, as shown in this example 如果服务商要求输入用户名、密码,点击编辑按钮,在编辑界面第二个文本框输入用户名和密码,如下图所示

然后,编辑第一个文本框内以 auth-user-pass 开头的,填写授权文件的完整路径。 授权文件的完整路径在第二个文本框内可见。 例如:
auth-user-pass /etc/openvpn/NLMiramUDP443E3.auth
3. 启用客户端开机自启服务并启动
在OpenVPN实例列表内,点击所需启动配置文件的Start按钮即可启动OpenVPN服务。 OpenVPN启动和关闭较慢,可能需要10s的时长完成。
如果需要VPN客户端开机启动一直保持连接,点击勾选所需开机启动的配置文件的已启用复选框。
注意: 如果点击 Start 按钮未能启动VPN进程。 勾选 已启用复选框,点击保存比应用按钮,以启动VPN进程。
4. 防火墙配置
At this point the VPN is set up and the router can use it, but devices in the LAN of your router won't be able to access the internet anymore.
We need to set the VPN network interface as public by assigning VPN interface to WAN zone.
4.1-a Openwrt版本低于 18.06/19.07
- Click on Network in the top bar and then on Interfaces to open the interfaces configuration page.
- Click on button Add new Interface...
- Fill the form with the following values: name =
tun0, Protocol =Unmanaged, Interface =tun0. Then click on Create Interface. - Edit the interface.
- In panel General Settings: unselect the checkbox Bring up on boot.
- In panel Firewall Settings: Assign firewall-zone to
wan. - Click on Save and Apply the new configuration.
- Reboot the router.


4.1-b Openwrt版本 19.07 (alternative to the above step 4.1)
Click on Network in the top bar and then on Firewall to open the firewall configuration page.
Click on the Edit button of the wan (red) zone in the Zones list at the bottom of the page.
Click on the Advanced Settings tab and select the tunX interface (tun0 in the screenshot, which is the most likely if you have a single OpenVPN client/server running)
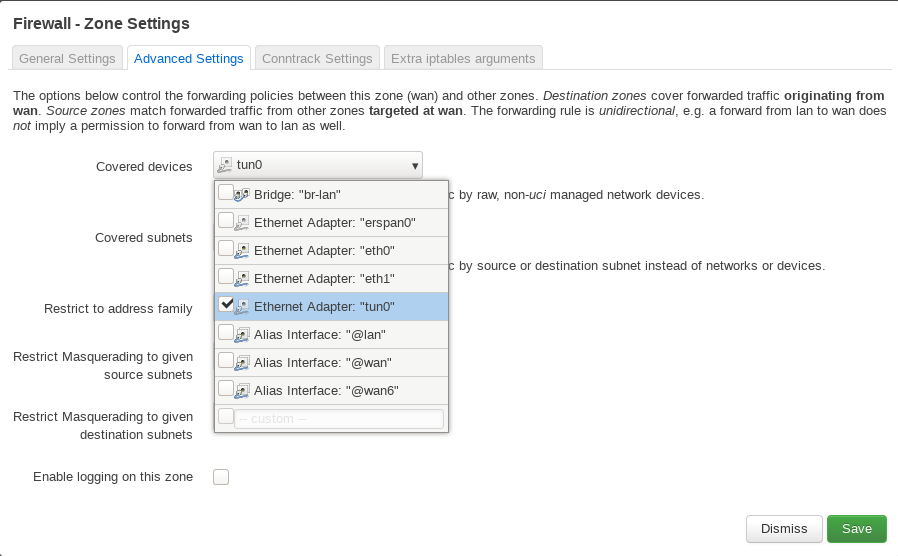
You can see the interface name if you click on Status on the top bar and then click on System Log.
A few lines from the system log where you can see the interface name of the OpenVPN client started with the configuration file NLMiramUDP443E3
 Fri Aug 30 11:28:32 2019 daemon.notice openvpn(NLMiramUDP443E3)[7993]: TUN/TAP device tun0 opened
 Fri Aug 30 11:28:32 2019 daemon.notice openvpn(NLMiramUDP443E3)[7993]: TUN/TAP TX queue length set to 100
 Fri Aug 30 11:28:32 2019 daemon.notice openvpn(NLMiramUDP443E3)[7993]: /sbin/ifconfig tun0 10.24.74.134 netmask 255.255.255.0 mtu 1500 broadcast 10.24.74.255
5. 测试是否一切正常
Establish the VPN connection. Verify your routing with traceroute and traceroute6.
traceroute openwrt.org
traceroute6 openwrt.org
Check your IP and DNS provider.
On router:
- Go to LuCI > Status > Wireguard and look for peer device connected with an IPv4 or IPv6 address and with a recent handshake time
- Go to LuCI > Network > Diagnostics and ipv4 ping client device IP eg. 10.0.0.10
On client device depending on wireguard software:
- Check transfer traffic for tx & rx
- Ping router internal lan IP
- Check public IP address in a browser – https://whatsmyip.com – should see public IP address of ISP for the router
6. 开启 Network Killswitch (可选, 推荐)
The “Network Killswitch” functionality, forces all traffic to go through the VPN. It's a fancy name for what is actually just a firewall rule.
This is best for privacy and security as it will ensure that no traffic can reach the Internet bypassing the VPN you have set up.
This also means that if the VPN connection is terminated, you lose access to the Internet, since no traffic is allowed outside of your VPN.
If you are setting up a Killswitch, it's strongly recommended to set the OpenVPN client to start and connect automatically on boot with the “Enable” checkbox, so that if the router is rebooted you don't lose Internet access (as without a VPN connected you will not be able to access the Internet anymore).
First remove the tun interface from wan zone in case you have followed the previous step 4.
Go to Network -→ Firewall, click on the Edit button of the Lan zone.
Click on the Allow forward to destination zones: menu and deselect the WAN zone, then click on Save.

Then click on Add button under the Zones list to add a new zone.
Select Masquerading, MSS Clamping and select the LAN interface in the Allow forward from source zones menu

6.1-a Openwrt版本低于 18.06/19.07
If you followed point 4.1-a, you should select your OpenWrt interface(s) in the Covered Networks menu and then click on Save.

Then on the bottom of the page, click on Save and Apply button as usual to confirm and save your changes.
6.1-b Openwrt版本 19.07 以及更新版本
If you followed point 4.1-b, you click on the Advanced Settings tab, open the Covered Interfaces menu, write tun+ in the open text box in the last.

Press Enter to add it.

This tun+ is a regex that allows this rule to work with up to 10 tun interfaces (i.e. 10 VPNs) at the same time, if you have more, you need to adjust it. Then on the bottom of the page, click on Save and Apply button as usual to confirm and save your changes.
6.2 停用 network Killswitch
Go to Network -→ Firewall, click on the Edit button of the Lan zone.
Click on the Allow forward to destination zones: menu and select the WAN zone again, then click on Save.

Then on the bottom of the page, click on Save and Apply button as usual to confirm and save your changes.
故障排查
If you discover DNS is not working, use LuCI and navigate to Network → Interfaces → LAN, disable peer DNS and specify your preferred DNS servers in the Use Custom DNS field, e.g. 8.8.8.8 and 8.8.4.4 for Google DNS.
Open a ssh remote terminal connection to the router.
Collect and analyze the following information.
# Restart services
service log restart; service openvpn restart; sleep 10

# Log and status
logread -e openvpn; netstat -l -n -p | grep -e openvpn

# Runtime configuration
pgrep -f -a openvpn
ip address show; ip route show table all
ip rule show; ip -6 rule show; nft list ruleset

# Persistent configuration
uci show network; uci show firewall; uci show openvpn
head -v -n -0 /etc/openvpn/*.conf
其他可参考的指南(LuCI界面配置 OpenVPN 客户端)
The link below is to a tutorial which was written for the BT Home Hub 5A and Windows Users in mind, but is sufficiently generic to apply to most other OpenWrt routers with a working internet connection. It has been tested with Asus RT-AC57u, Linksys EA6350v3, TPlink Archer C50 v4, Western Digital MyNet N750 etc.
The original v1.1 guide supports LEDE 17 and OpenWrt 18. The later v1.2 guide is for OpenWrt 19.07 using its new ovpn file upload function. Includes information on DNS resolver, Kill switch, and popular VPN providers.
If you are having difficulties getting openvpn client to work using the instructions contained on this wiki page, please download and study the tutorial PDF from the Dropbox folder found in the ebilan forum.